25 Shopify Flow Examples: Real Workflows from a Shopify Agency (2026)

Most Shopify Flow guides describe workflows the way a recipe describes cooking: technically accurate, but useless until you've burned something in a real kitchen.
We've set up Shopify Flow automations for dozens of live stores. Some were elegant and took 10 minutes to build. Some broke in production and took 90 minutes to debug. This guide covers what actually works, and where Flow quietly fails.
What you'll find here: 25 real workflows organized by difficulty, from the five-minute basics every store needs to expert-level GraphQL mutations and looping workflows no other guide covers. We'll also tell you exactly what Flow can't do and when to reach for a different tool.
One thing worth clearing up before you start: Shopify Flow is free for all paid Shopify plans. You do not need Shopify Plus. That was true until 2022. It hasn't been true since. The only exceptions are the B2B workflows in Section 5, which do require Plus. We'll call those out clearly.
Contents
- How Shopify Flow Works (The 60-Second Version)
- Beginner Flow Examples: Every Store Needs These
- Intermediate Flow Examples: For Growing Stores
- Advanced Flow Examples: Expert-Level Techniques
- How We Used Flow to Eliminate 15 Hours of Manual Work Per Week
- When Not to Use Shopify Flow (The Honest Version)
- Testing and Debugging Shopify Flow Workflows
- Frequently Asked Questions
- Start With the Workflows That Matter
How Shopify Flow Works (The 60-Second Version)
Flow is Shopify's native no-code automation tool. Every workflow is built from three pieces.
The Three Building Blocks
Trigger: The event that starts the workflow. Flow watches for this event to happen and fires the workflow when it does. Examples: Order created, Inventory quantity changed, Customer tag added, Schedule (daily, weekly, hourly).
Condition: Optional filters that must be true before the action runs. If conditions aren't met, Flow skips the workflow silently. Examples: Order total greater than $500, Customer tag does NOT contain "vip", Risk level equals HIGH.
Action: What happens when the trigger fires and conditions pass. Examples: Add tag, Send internal email, Update metafield, Send Admin API request (GraphQL), For Each (loop over a list).
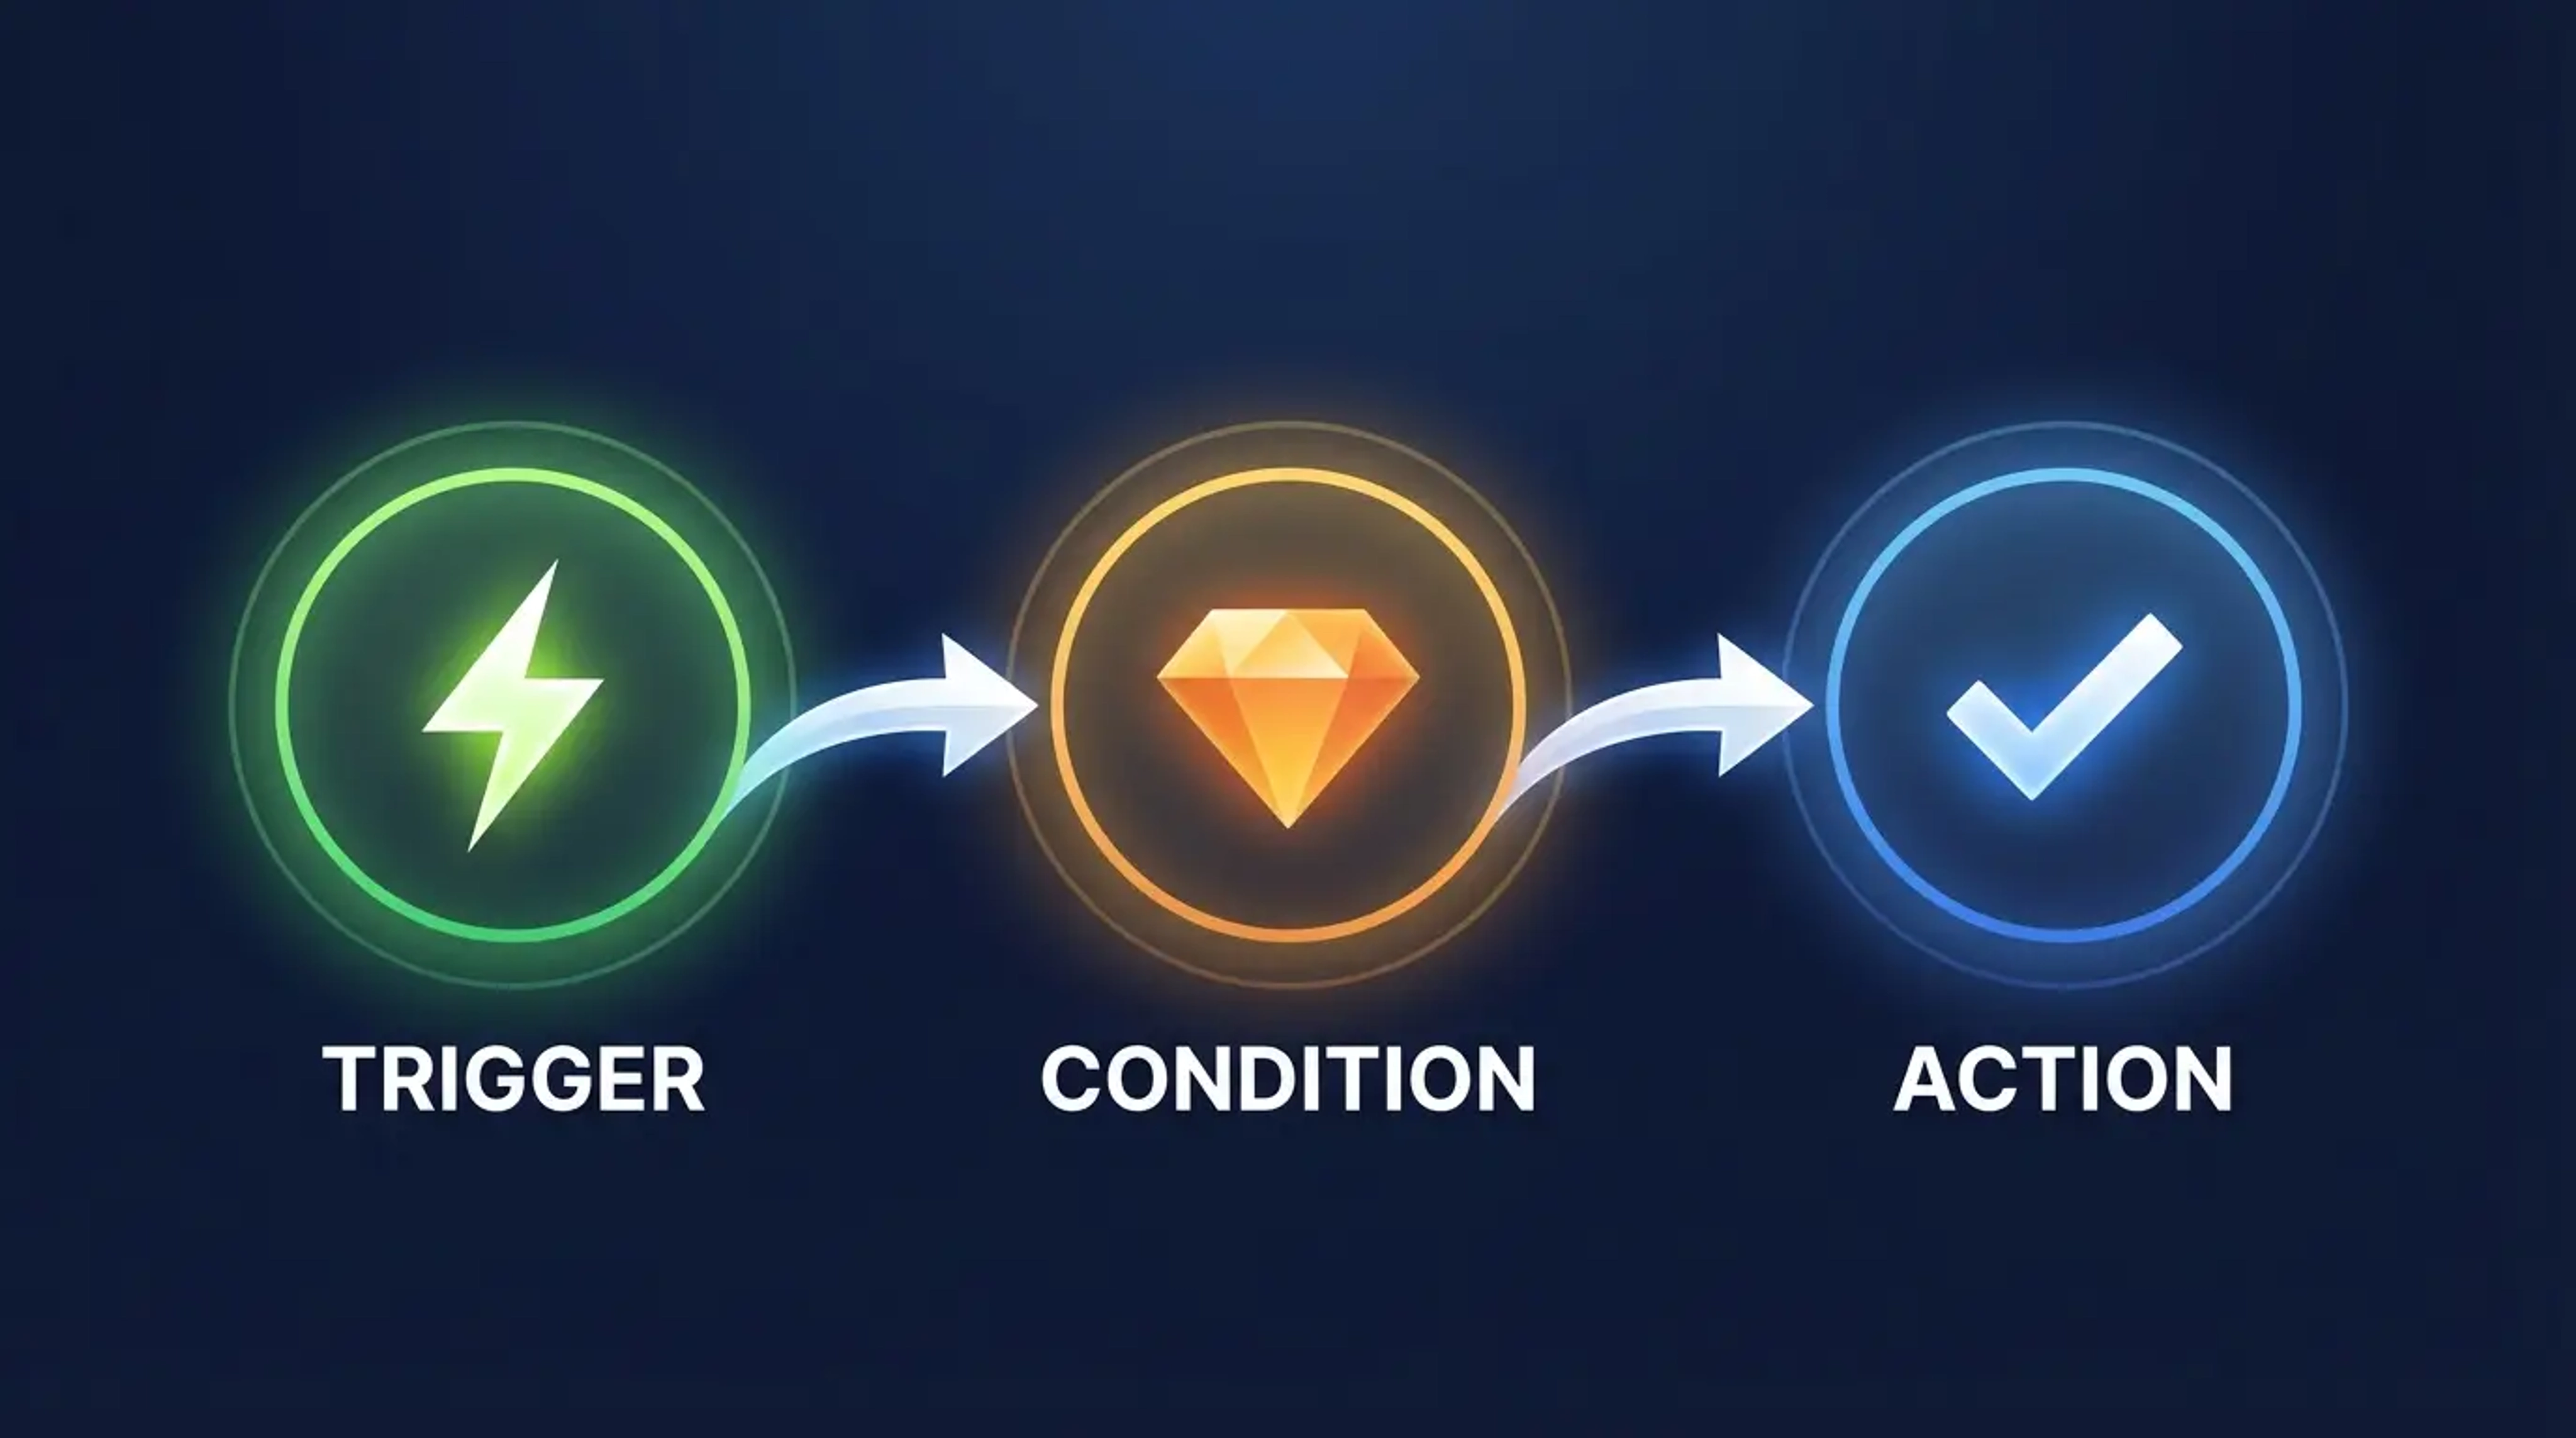
A simple example: Order Created → Risk Level equals HIGH → Cancel Order + Tag Customer "fraud-blocked." That's a real, production-ready workflow that takes about 12 minutes to set up. We'll walk through it in Section 2.
What Plan Do You Need?
| Feature | Basic Shopify | Shopify | Advanced | Shopify Plus |
|---|---|---|---|---|
| Shopify Flow app | ✓ Free | ✓ Free | ✓ Free | ✓ Free |
| Standard workflows | ✓ | ✓ | ✓ | ✓ |
| Connector apps (Klaviyo, Gorgias, etc.) | ✓ | ✓ | ✓ | ✓ |
| Shopify Messaging workflows | ✓ | ✓ | ✓ | ✓ |
| Shopify Collabs workflows | ✓ | ✓ | ✓ | ✓ |
| B2B and wholesale workflows | ✗ | ✗ | ✗ | ✓ |
The most common misconception: Flow is not Shopify Plus-only. It was until 2022. It isn't now. Several articles still ranking on Google get this wrong, including one written in 2021 that somehow still sits on page one. The only Plus-exclusive workflows are B2B features. Everything else in this guide works on Basic, Shopify, or Advanced plans.
You can install Flow for free at admin.shopify.com/apps/flow. Shopify also maintains a library of 150+ pre-built templates you can install with one click.
Beginner Shopify Flow Examples (Every Store Needs These)
These eight workflows are the foundation. If you're new to Flow, build these first. They cover the highest-impact, lowest-complexity automations. Most stores should have all of them running.
1. Low Inventory Alert
🟢 Beginner | Setup time: 5-10 minutes | 🏷️ Template available
The problem: Products go out of stock at 2am while you're asleep. By 9am you've missed two hours of sales and your customer service inbox has three "where's my order?" emails.
The setup:
- Trigger: Inventory quantity changed
- Condition 1: Prior inventory quantity is greater than or equal to 5
- Condition 2: Current inventory quantity is less than 5
- Action: Send internal email with product name, SKU, and current stock level
What the trigger actually fires on: Any inventory change for any variant. Without conditions, this fires every time stock changes, which could be dozens of times per day.
💡 Pro Tip: The dual condition is the key. "Prior quantity >= 5 AND Current quantity < 5" means this fires exactly once: when you cross the threshold from "above alert level" to "below alert level." It doesn't fire on every inventory move. No other guide on the SERP explains this correctly.
⚠️ Implementation Warning: If your store has multiple locations, this workflow fires per location. A product with 3 units in Chicago and 3 in Miami triggers twice, once for each location when that location dips below five. Add a location condition, or switch from per-location inventory to "total inventory" if your setup allows it.
Our Take: This is the single most universally useful Flow workflow. It takes under ten minutes and prevents the kind of revenue loss that quietly adds up to thousands per year. Build this before anything else.
2. Cancel and Tag High-Risk Orders
🟢 Beginner | Setup time: 10-15 minutes | 🏷️ Template available
The problem: Shopify's fraud analysis flags HIGH risk orders but doesn't act on them. They just sit there waiting for a human to review, or ship by default.
The setup:
- Trigger: Order created (or Payment captured, depending on your payment flow)
- Condition: Order risk level equals HIGH
- Action 1: Cancel order
- Action 2: Restock items
- Action 3: Send cancellation email to customer
- Action 4: Add tag to order: "high-risk-cancelled"
- Action 5: Add tag to customer: "fraud-flagged"
Variation for merchants who prefer a softer approach: Instead of auto-cancelling, hold payment capture and route to a review queue. Set up a second workflow: Order created → Risk equals HIGH → Add tag "fraud-review" + Send internal email to your ops team.
💡 Pro Tip: Add a second workflow layered on top of this one. Trigger: Customer tag added → Tag equals "fraud-flagged." Condition: Count of orders from this customer in last 30 days is greater than or equal to 3. Action: Add customer tag "fraud-blacklist." First-time offenders get auto-cancelled. Repeat offenders get blacklisted so every future order from that email gets caught automatically.
Our Take: Your fraud analysis score already did the work. This workflow just acts on it. The time savings compound fast on any store doing more than 50 orders per day.
3. Tag a Customer's First Order
🟢 Beginner | Setup time: 5 minutes | 🏷️ Template available
The problem: Your Klaviyo welcome series for first-time buyers only fires if you can identify first-time buyers. Flow handles the identification.
The setup:
- Trigger: Order created
- Condition: Customer orders count equals 1
- Action 1: Add tag to customer: "first-order"
- Action 2: Add tag to order: "first-order"
Tag the customer AND the order. The customer tag powers your Klaviyo welcome flow. The order tag makes first-order revenue filterable in your analytics and order exports.
💡 Pro Tip: If you're using Klaviyo, this Flow workflow removes your dependency on Klaviyo's native first-purchase sync. Klaviyo's integration is reliable but lags by a few minutes. Flow fires on order creation with essentially zero delay.
Our Take: Deceptively simple. This single workflow is the foundation of every first-purchase marketing flow we configure for clients. Five minutes of setup, years of payoff.
4. Hide and Republish Out-of-Stock Products
🟢 Beginner | Setup time: 10-15 minutes | 🏷️ Template available
The problem: Out-of-stock products rank in Google Shopping and generate ad spend, then send shoppers to a dead end. Auto-hiding them protects conversion rate and ad budget.
This requires two workflows working together.
Workflow 1 (Hide):
- Trigger: Inventory quantity changed
- Condition: Total inventory across all locations equals 0
- Action: Remove product from Online Store sales channel
Workflow 2 (Republish):
- Trigger: Inventory quantity changed
- Condition 1: Total inventory across all locations is greater than 0
- Condition 2: Product is currently not published (status = false)
- Action: Publish product to Online Store
⚠️ Implementation Warning: Backorders. If you run a backorder or pre-order strategy, products you want to keep visible will get hidden by Workflow 1. Add a condition: "Product tag does NOT contain 'backorder'." Without this exception, Flow will hide your pre-order products the moment they hit zero stock.
⚠️ Implementation Warning: Multi-location. "Total inventory across all locations equals 0" is critical. The simpler "Inventory quantity is less than 1" only checks the default location. A product with zero stock in Chicago but 12 units in Miami would get hidden by accident. Use the total inventory field, not the location-specific one.
Our Take: Clean implementation is harder than it looks. The two warnings above took us real-world troubleshooting to discover. The backorder gotcha alone has caught three separate clients.
5. Tag Orders by Sales Channel
🟢 Beginner | Setup time: 5 minutes | 🏷️ Template available
The problem: POS orders, online store orders, draft orders, and Buy Button orders all look the same in your order list. Separating them makes reporting, fulfillment routing, and analytics dramatically cleaner.
The setup (repeat for each channel you use):
- Trigger: Order created
- Condition: Sales channel equals "Point of Sale" (or "Online Store," "Draft Orders," "Buy Button")
- Action: Add order tag: "pos-order" (or "web-order," "draft-order," "buy-button-order")
Five variants cover most stores:
pos-orderfor POS salesweb-orderfor your online storedraft-orderfor manual ordersbuy-button-orderfor embedded Buy Button purchasessubscription-orderfor orders from Recharge, Skio, or similar
💡 Pro Tip: These tags persist on the order permanently. Set them up now and your entire order history becomes filterable by channel from the moment you activate.
Our Take: Five minutes to build. Every single client we've set this up for wonders how they managed without it. Operations teams and finance teams are the biggest beneficiaries.
6. Welcome New Customers with a Tag (or Email)
🟢 Beginner | Setup time: 10 minutes | 🏷️ Template available
The problem: New account registrations disappear into your customer list with zero action taken. First impressions compound.
Two variants here. Choose based on your email stack.
Variant A: Tag for Klaviyo (if you're using Klaviyo):
- Trigger: Customer created
- Action 1: Add customer tag: "new-customer"
- Action 2: Add customer tag: "welcome-email-pending"
Klaviyo picks up the "new-customer" tag and fires your welcome series. Clean, reliable, no additional config needed.
Variant B: Shopify Messaging (no Klaviyo required):
- Trigger: Customer created
- Action: Send Shopify Messaging email (branded transactional email from Shopify's native email delivery)
Shopify Messaging is a connector app built by Shopify that lets Flow send branded emails without any third-party email platform. It's genuinely new. None of the other articles on this topic cover it. If you're a smaller store that hasn't committed to Klaviyo, this gives you a welcome email capability at zero added cost.
When you're ready to evaluate your email platform choices, see our comparison of Shopify Email vs Klaviyo.
Our Take: Variant B is underutilized. Most merchants assume they need Klaviyo to send a welcome email from Flow. They don't.
7. Automated Collection Tagging
🟢 Beginner | Setup time: 5-10 minutes | 🏷️ Template available
The problem: Manually adding products to collections when they receive a specific tag is tedious and easy to forget. Merchandising teams spend more time on admin than they should.
The setup:
- Trigger: Product tag added
- Condition: Tag equals "summer-2026" (or whatever your collection tag is)
- Action 1: Add product to collection: "Summer 2026"
- Action 2: (Optional) Send internal notification to merchandising team
The reverse workflow (remove from collection when tag is removed):
- Trigger: Product tag removed
- Condition: Tag equals "summer-2026"
- Action: Remove product from collection: "Summer 2026"
💡 Pro Tip: This workflow pairs well with automated product imports. If your catalog feed adds tags for seasonal categorization, this Flow turns those tags into automatic collection membership. No human touch required.
Our Take: Small workflow, large operational payoff. Merchandising teams running seasonal campaigns update one tag per product instead of manually managing collection membership. That scales well as catalog size grows.
8. POS Restock Alert
🟢 Beginner | Setup time: 10-15 minutes
The problem: In-store sales bypass your normal inventory monitoring. A busy Saturday can drain a key SKU at your POS location without triggering your standard low-inventory alert, because the POS sale hits inventory differently than online orders do in some configurations.
The setup:
- Trigger: Order created
- Condition 1: Sales channel equals "Point of Sale"
- Condition 2: Any line item inventory quantity (at POS location) is less than 5
- Action 1: Add order tag: "pos-restock-needed"
- Action 2: Send internal email to buyer or location manager with SKU, product name, and current stock at that location
⚠️ Implementation Warning: This workflow requires you to scope the inventory condition to the specific POS location, not total inventory across all locations. A SKU might be low at your retail store but fully stocked in your warehouse. The alert should be location-specific or your buyer will chase phantom shortages.
Our Take: Retail and omnichannel merchants need this running. Warehouse replenishment cycles and in-store sell-through rates move at different speeds. This closes the gap.
Intermediate Shopify Flow Examples (For Growing Stores)
These nine workflows require more logic: multiple conditions, app integrations, or cross-object data. They're where Flow starts saving serious time. Most take 20-60 minutes to configure correctly.
9. Customer Lifetime Spend Tiers (VIP Segmentation)
🟡 Intermediate | Setup time: 20-30 minutes
The problem: Loyalty programs need to know who your best customers are. Manual tier assignment doesn't scale.
The setup (build one workflow per tier):
Tier 1 ($500+):
- Trigger: Order payment captured
- Condition: Customer lifetime spend is greater than or equal to 500
- Action: Add customer tag: "vip-tier-1"
Tier 2 ($1,000+):
- Trigger: Order payment captured
- Condition: Customer lifetime spend is greater than or equal to 1000
- Action: Add customer tag: "vip-tier-2," Remove customer tag: "vip-tier-1"
Tier 3 ($2,500+):
- Trigger: Order payment captured
- Condition: Customer lifetime spend is greater than or equal to 2500
- Action: Add customer tag: "vip-tier-3," Remove customer tags: "vip-tier-1," "vip-tier-2"
⚠️ Implementation Warning: Flow's "Customer lifetime spend" field is Shopify's native sum of all paid orders, not a custom field you configure. Do not confuse this with "Customer orders count." We've seen implementations built with "Order count greater than 5." That tags frequent buyers, not high spenders. A customer who buys 10 $15 items is not the same as a customer who bought two $600 orders. Use lifetime spend.
💡 Pro Tip: Add a reverse workflow for refunds. When a large refund drops a customer below a tier threshold, remove the tier tag. This keeps your VIP list accurate and prevents a $2,500 customer from staying in Tier 3 after returning $2,000 of merchandise.
Our Take: Klaviyo can segment on lifetime spend too, but the tags Flow creates here persist everywhere in Shopify: customer list, order admin, discount code eligibility checks. Both tools benefit from each other here.
10. Fraud Review Before Payment Capture
🟡 Intermediate | Setup time: 20-30 minutes
The problem: For stores using manual payment capture, you need to distinguish clean orders (capture immediately) from gray-area orders (review first) without a human touching every transaction.
The setup (two workflows):
Auto-capture for low-risk orders:
- Trigger: Order created, payment pending
- Condition: Order risk level equals LOW
- Action: Capture payment
Hold and flag for medium-risk:
- Trigger: Order created
- Condition: Order risk level equals MEDIUM
- Action 1: Add order tag: "fraud-review"
- Action 2: Add internal order note: "Medium risk: manual review required before capture"
- Action 3: Send internal email to fraud@yourdomain.com with order details
Our Take: This is the enterprise version of the blunt "cancel everything HIGH risk" workflow. Instead of a binary cut, it creates a three-tier system: auto-capture clean orders, human review for gray areas, auto-cancel everything that's clearly fraud. We use this pattern for clients doing above $200K/month where any false-positive cancellation is a real customer relationship cost.
11. Serial Returner Alert
🟡 Intermediate | Setup time: 30 minutes
The problem: Some customers abuse return policies. You don't find out until you've shipped them five orders, accepted five returns, and paid five-way return shipping.
This requires two workflows working together.
Workflow 1 (Flag on new order):
- Trigger: Order created
- Condition: Customer tag contains "serial-returner"
- Action 1: Add internal order note: "Flagged: serial returner. Review before fulfilling."
- Action 2: Send email to ops team with order details
Workflow 2 (Identify new serial returners):
- Trigger: Return created (or Refund created)
- Condition: Customer return count in last 90 days is greater than or equal to 3
- Action: Add customer tag: "serial-returner"
We built this exact workflow for a DTC apparel brand dealing with wear-and-return abuse, where customers buy for an event, wear the item, then return it. The two-workflow combo flags new orders from problem customers AND continuously identifies new ones. Once someone gets the tag, every future order from that email gets flagged automatically before you fulfill it.
Our Take: The cost of building this (30-45 minutes) is recovered the first time your ops team catches a serial returner before shipping. Set it up, let it run. It identifies new problem customers automatically as return patterns emerge.
12. Rush Order and Expedited Fulfillment Routing
🟡 Intermediate | Setup time: 20-30 minutes | 🏷️ Template available
The problem: Customers who pay for overnight or express shipping expect it to be handled differently. If your fulfillment team processes all orders the same way, expedited orders get discovered during normal batch picking. Too late.
The setup:
- Trigger: Order created
- Condition: Shipping rate title contains "Express" OR Shipping rate title contains "Overnight"
- Action 1: Add order tag: "rush"
- Action 2: Send email to fulfillment@yourdomain.com with order number and shipping method
- Action 3: Add internal order note: "RUSH ORDER: expedited fulfillment required"
Variation for 3PL partners: Replace the email action with a webhook action that POST-notifies your 3PL's system directly with order data. Most modern 3PLs expose a webhook endpoint for this.
💡 Pro Tip: Add a Slack notification action if your fulfillment team uses Slack. Real-time channel alert beats email when someone needs to act within the hour. The Slack connector app for Flow handles this natively.
Our Take: Express shipping customers paid a premium for speed. This workflow ensures that premium is actually delivered. Without it, rushed orders get discovered too late and you're issuing refunds on the shipping cost.
13. Win-Back Campaign Trigger (Klaviyo Integration)
🟡 Intermediate | Setup time: 30-45 minutes
The problem: Customers who haven't ordered in 90 days need a win-back email sequence. Flow identifies the right customers; Klaviyo handles the email logic.
The setup:
- Trigger: Order created
- Action 1: Get customer's previous orders (using Get Data action, filtered to orders older than 90 days)
- Condition: Previous order exists AND last order date was more than 90 days before today
- Action 2: Add customer tag: "at-risk-winback"
Klaviyo's Shopify integration watches for tag changes. When "at-risk-winback" appears on a customer profile, Klaviyo fires your win-back sequence automatically.
⚠️ Implementation Warning: Flow doesn't do date arithmetic natively. "Last order was more than 90 days ago" requires the Get Data action to retrieve prior orders, then a condition check on the created date. The simpler-looking condition ("Customer last order date") doesn't exist as a ready-made Flow field. Test this with a real order before activating.
For a full breakdown of which email platform handles post-Flow customer journeys best, see our Klaviyo Alternatives guide and our roundup of the best email marketing tools for Shopify.
Our Take: Flow's job here is simple: apply the tag at the right moment. Klaviyo does the rest. The two tools have distinct responsibilities, and this workflow is a clean example of that division working correctly.
14. Post-Purchase Review Request (Timed After Fulfillment)
🟡 Intermediate | Setup time: 20-30 minutes | 🏷️ Template available
The problem: Most review request setups trigger X days after purchase. That means customers buying ground shipping with a 7-day delivery window get a review request for an order that hasn't arrived yet.
The fix: Trigger on fulfillment, not purchase.
The setup (with Yotpo or Judge.me connector):
- Trigger: Fulfillment created
- Action 1: Wait 7 days
- Action 2: Send API request to your review platform with order and customer data
Without a connector app:
- Trigger: Fulfillment created
- Action 1: Wait 7 days
- Action 2: Add order tag: "review-request-pending"
- Let Klaviyo pick up the tag change and handle the email
💡 Pro Tip: Add a minimum order value condition. "Order total is greater than or equal to 30." Don't spend a review request slot on a $9 sticker purchase. Customers are more motivated to review products they made a real buying decision about.
Our Take: Fulfillment-triggered review requests arrive when the product is already in the customer's hands, not while it's still in transit. That single timing change improves review quality and reduces frustrated "I haven't even received it" responses.
15. Subscription Customer Tagging (Recharge and Skio)
🟡 Intermediate | Setup time: 20-30 minutes
The problem: Subscription-first Shopify brands need to distinguish subscription orders from one-time purchases. Without the distinction, your entire segmentation and email strategy treats subscribers and one-timers identically.
The setup:
- Trigger: Order created
- Condition: Order source equals "recharge" OR Order tag contains "subscription"
- Action 1: Add customer tag: "subscriber"
- Action 2: Add order tag: "subscription-order"
Churn prevention variant:
- Trigger: Customer tag added
- Condition: Tag added equals "subscription-cancelled"
- Action 1: Add customer tag: "churned-subscriber"
- Action 2: Send internal notification to retention team
💡 Pro Tip: The "subscription-cancelled" tag is applied by Recharge or Skio automatically when a subscription is cancelled. This Flow workflow catches that moment and routes it to your retention team before the customer is fully gone.
Our Take: Table stakes for any subscription brand. Klaviyo needs the "subscriber" tag to correctly power your subscription email flows. Without it, subscribers and one-time buyers get identical treatment. Five minutes of setup prevents a fragmented customer experience.
16. Shopify Markets and Multi-Currency Order Tagging
🟡 Intermediate | Setup time: 10-15 minutes
The problem: International orders processed through Shopify Markets require different handling: currency conversion documentation, regional fulfillment routing, and separate reporting. Mixed in with domestic orders, they're invisible until something breaks.
The setup:
- Trigger: Order created
- Condition: Order currency does not equal "USD" (replace with your store's base currency)
- Action 1: Add order tag: "international-order"
- Action 2: Add order tag with currency code (e.g., "currency-eur," "currency-gbp") using Flow's template variables:
{{order.currencyCode}}
Expanded version for region-specific routing:
- Condition: Shipping address country equals "GB"
- Action: Add tag "uk-order" + Send notification to UK fulfillment partner
💡 Pro Tip: Build one workflow per major market rather than one generic "international" workflow. Your UK fulfillment team and your EU fulfillment team need different information. Currency tagging plus country-based routing gives you clean separation without custom development.
Our Take: As Shopify Markets adoption grows, this workflow is increasingly necessary for any store selling cross-border. Build it when you activate Shopify Markets, not after you've already got six months of untagged international orders to sort through.
17. Scheduled Daily Fulfillment Summary
🟡 Intermediate | Setup time: 30-45 minutes | Introduction to For Each
The problem: Your ops team needs to start each morning knowing which orders from yesterday aren't fulfilled yet. The current process: manual export, filter, email. Every day.
The setup:
- Trigger: Schedule (daily at 8:00 AM)
- Action 1: Get orders (filter: created at is yesterday, fulfillment status equals unfulfilled)
- Action 2: For Each order in the list, add order data to an email digest variable
- Action 3: Send internal email to ops@yourdomain.com with the complete list
This workflow introduces two of Flow's most powerful features: the scheduled trigger (run on a time-based schedule, not an event) and For Each (loop over a list of results). We cover both in depth in the Advanced section.
💡 Pro Tip: This is where Flow shifts from reactive (responding to events) to operational (proactively surfacing information your team needs). Most merchants only use reactive Flow. The scheduled plus For Each combination is where the real ops leverage lives.
Our Take: Build this after you've got the basics running. It requires understanding Get Data and For Each, which take a bit longer to configure correctly. But the payoff is real: eliminating a daily manual export compounds over every single weekday.
18. Warranty Registration via Metafield
🟡 Intermediate | Setup time: 30-45 minutes
The problem: Warranty-eligible products need a registration record tied to each order. Manually tracking warranty start dates and expiration windows in a spreadsheet is both error-prone and unscalable.
The setup:
- Trigger: Order paid
- Condition: Any line item has product tag "warranty-eligible"
- Action 1: Send Admin API request (GraphQL) to update order metafield
warranty.expiration_datewith a value calculated from today plus your warranty window (see note) - Action 2: Send Shopify Messaging email to customer confirming their warranty period and registration details
The GraphQL mutation for setting the order metafield:
mutation orderMetafieldUpdate($input: OrderInput!) {
  orderUpdate(input: $input) {
    order {
      id
      metafields(first: 3) {
        edges {
          node {
            namespace
            key
            value
          }
        }
      }
    }
    userErrors {
      field
      message
    }
  }
}
Variables:
{
  "input": {
    "id": "{{order.id}}",
    "metafields": [
      {
        "namespace": "warranty",
        "key": "registered",
        "value": "true",
        "type": "boolean"
      },
      {
        "namespace": "warranty",
        "key": "order_date",
        "value": "{{order.createdAt}}",
        "type": "single_line_text_field"
      }
    ]
  }
}
⚠️ Implementation Warning: Flow can't do date arithmetic (today + 365 days). The warranty expiration date calculation requires either: (a) storing the order date and calculating expiration at query time in your theme or app, or (b) using a custom app to calculate and write the exact expiration date via API. This workflow handles registration confirmation. Expiration calculation is a separate step.
Our Take: For brands with physical products carrying manufacturer warranties, this closes a documentation gap that typically lives in spreadsheets or third-party warranty apps. The order metafield persists in Shopify permanently and is queryable by your team or customer-facing theme.

Advanced Shopify Flow Examples (Expert-Level Techniques)
These workflows use the For Each action, GraphQL mutations, and scheduled bulk operations. They separate expert Flow implementations from basic ones. None of these appear in any competitor article we found.
If you're a developer or technically-minded merchant, this section is for you. The beginner and intermediate sections above will serve most stores well on their own.
19. For Each: Bulk Customer Tier Update (Scheduled Weekly)
🔴 Advanced | Setup time: 1-2 hours | Zero competitors cover this
The problem: Your VIP customer tiers update when each order fires, which means customers who crossed a tier threshold last week but haven't ordered since never get re-evaluated. Weekly customers get timely updates. Infrequent big spenders don't.
The fix: A weekly scheduled workflow that evaluates all customers.
The setup:
- Trigger: Schedule (every Sunday at 2:00 AM, off-peak hours)
- Action: Get customers (filter: customer tag does NOT contain "vip-tier-3", to skip customers already at the highest tier)
- Action: For Each customer in the list:
- Condition A: If customer lifetime spend is greater than or equal to 2500, add tag "vip-tier-3," remove tags "vip-tier-1" and "vip-tier-2"
- Condition B: Else if lifetime spend is greater than or equal to 1000, add tag "vip-tier-2," remove tag "vip-tier-1"
- Condition C: Else if lifetime spend is greater than or equal to 500, add tag "vip-tier-1"
⚠️ Implementation Warning: Performance. The For Each action runs sequentially, not in parallel. For a store with 50,000 customers, this workflow can take hours to complete. Scope your "Get customers" action with tight filters to limit the list size. Running at 2am protects your store's performance during peak traffic.
⚠️ Implementation Warning: Infinite Loops. If your For Each action adds a tag that triggers another workflow, which then triggers this one, you have an infinite loop. Use a workflow run limit or add a condition to prevent re-triggering. We've seen this happen in production and it is not a fun debugging session.
💡 Pro Tip: Add a condition at the top: "Customer tag does NOT contain 'tier-evaluated-this-week'." Add that tag at the end of each For Each loop. Clear it with a second Monday morning workflow. This prevents the workflow from evaluating the same customer multiple times if it re-runs.
Our Take: This is the workflow that reveals Flow's real operational power. Reactive triggers are useful. Scheduled bulk operations on a defined customer set are how ops teams actually run stores at scale.
20. For Each: End-of-Day Inventory Sweep
🔴 Advanced | Setup time: 1-2 hours
The problem: Your real-time hide/republish workflow (Workflow 4 above) catches most out-of-stock events. But bulk inventory imports, POS sales, and API-driven inventory changes sometimes bypass it. You find published-but-OOS products the next morning.
The fix: A nightly sweep that catches everything the real-time workflow missed.
Nightly hide sweep (11:45 PM):
- Trigger: Schedule (daily at 11:45 PM)
- Action: Get product variants (filter: inventory quantity equals 0, status equals active, published equals true)
- Action: For Each variant, update product status to draft (unpublish)
Morning republish sweep (6:00 AM):
- Trigger: Schedule (daily at 6:00 AM)
- Action: Get product variants (filter: inventory quantity greater than 0, status equals draft)
- Action: For Each variant, update product status to active (republish)
💡 Pro Tip: Add the backorder tag exception here too ("Product tag does NOT contain 'backorder'"), same as in Workflow 4. The scheduled sweep and the real-time workflow should have matching exception logic or they'll conflict.
Our Take: This workflow is a safety net, not a replacement for the real-time version. Both together mean you're covered: real-time catches immediate events, scheduled sweep catches edge cases. The combination takes about 90 minutes to build correctly including testing.
21. For Each: Block Returns on Final Sale Line Items
🔴 Advanced | Setup time: 1-2 hours
The problem: Final sale items should not be returnable, but customers submit return requests anyway. Without automation, your ops team manually reviews every return request to catch final sale items. That review doesn't always happen before the return is approved.
The setup:
- Trigger: Return created
- Action: For Each line item in the return request:
- Condition: Line item product tag contains "final-sale"
- Action A: Decline the return line item
- Action B: Add order tag: "return-blocked-final-sale"
- Action C: Send Shopify Messaging email to customer explaining the final sale policy for that item
⚠️ Implementation Warning: This workflow evaluates each line item individually. A return with five items where one is final sale and four are not will result in a partial return: the four non-final-sale items are approved, the final sale item is blocked. Make sure your ops team understands this split-return scenario before activating.
💡 Pro Tip: Send the customer a clear explanation in the email, not just a blocked notification. The message should name the specific product and link to your final sale policy. A blocked return with no explanation creates a support ticket. A blocked return with a clear explanation usually doesn't.
Our Take: Return policy enforcement is exactly the kind of rule-based, repetitive decision that Flow handles well. Manual review catches 80% of final sale return attempts. This catches 100%, including nights and weekends when no one is reviewing.
22. GraphQL Action: Update Customer Metafield on Order Creation
🔴 Advanced | Setup time: 1-3 hours | Zero competitors cover this
When to use GraphQL in Flow: Flow's standard actions cover most use cases. When you need to update complex data, write to metafields with specific types, or do something the native actions don't support, the "Send Admin API request" action with GraphQL is the tool.
The use case: When an order is created, write the customer's current tier to a customer metafield (not just a tag) for use in your Shopify Liquid theme. Metafields are more reliable for theme personalization than tags. They survive app reinstalls and theme updates more consistently.
The GraphQL mutation:
mutation customerUpdate($input: CustomerInput!) {
  customerUpdate(input: $input) {
    customer {
      id
      metafields(first: 5) {
        edges {
          node {
            namespace
            key
            value
          }
        }
      }
    }
    userErrors {
      field
      message
    }
  }
}
Variables (filled in by Flow using template variables):
{
  "input": {
    "id": "{{customer.id}}",
    "metafields": [
      {
        "namespace": "loyalty",
        "key": "tier",
        "value": "gold",
        "type": "single_line_text_field"
      }
    ]
  }
}
How to configure this in Flow:
- Add a "Send Admin API request" action
- Method: HTTP POST
- URL:
https://{your-shop}.myshopify.com/admin/api/2025-01/graphql.json - Headers:
X-Shopify-Access-Token: {your-app-token},Content-Type: application/json - Body: The mutation plus variables above, with Flow template variables for
customer.id
See Shopify's GraphQL Admin API documentation for the full reference on available mutations.
⚠️ Implementation Warning: The Admin API request action requires an authenticated app token. You cannot use Flow's own OAuth here. You need a custom app or private app with write_customers scope. This is a 30-minute developer task if you haven't set up a Shopify custom app before. For non-developers: this one requires a dev assist.
Our Take: Tags are great for segmentation. Metafields are better for data that needs to render in your storefront theme. A Liquid snippet reading customer.metafields.loyalty.tier is cleaner than trying to extract tier from a tag string. And metafields survive the kinds of bulk tag cleanups that periodically nuke important customer data.
23. GraphQL Action: Bulk Historical Order Tag Update
🔴 Advanced | Setup time: 1-2 hours
The use case: You ran a promotion with discount code "SUMMER25." Now you need to tag all orders from the last 30 days that used that code for reporting, but those orders already exist. Real-time triggers only catch new events.
The setup:
- Trigger: Manual trigger (run once)
- Action: Get orders (filter: created at is in last 30 days, discount codes contains "SUMMER25")
- Action: For Each order in list, send Admin API request with GraphQL mutation to add tag "summer25-promo" to each order
The GraphQL mutation for order tagging:
mutation tagsAdd($id: ID!, $tags: [String!]!) {
  tagsAdd(id: $id, tags: $tags) {
    node {
      id
    }
    userErrors {
      field
      message
    }
  }
}
Variables:
{
  "id": "{{order.id}}",
  "tags": ["summer25-promo"]
}
⚠️ Implementation Warning: Use tagsAdd, not orderUpdate. The orderUpdate mutation with a tags field REPLACES all existing tags on the order. If you have orders with 10 existing tags and run orderUpdate to add one more, you'll end up with only the one new tag. Use the tagsAdd mutation (available in Shopify Admin API 2021-01 and later) to append tags without wiping existing ones. This is a common GraphQL mistake that causes real data loss.
💡 Pro Tip: Use the manual trigger for one-time retroactive operations. Once the workflow runs and all orders are tagged, deactivate it. You don't need it firing again.
Our Take: This is the kind of workflow that makes operations teams genuinely happy. Retroactive bulk tagging of historical orders with no data export, no developer plugin, no spreadsheet manipulation. Set it up, run it once, done.
24. First-Time Discount Code Abuse Detection
🔴 Advanced | Setup time: 1-2 hours
The problem: First-order discount codes like "WELCOME10" get shared publicly and abused by repeat customers using new email addresses.
Realistic solution (catches the majority of abuse):
- Trigger: Order created
- Condition 1: Discount code equals "WELCOME10" (or contains "WELCOME")
- Condition 2: Customer orders count is greater than 1
- Action 1: Add order tag: "discount-abuse-suspected"
- Action 2: Add customer tag: "discount-abuser"
- Action 3: Send internal alert email to your fraud team
Variation using shipping address matching (more comprehensive but requires GraphQL):
- Trigger: Order created
- Condition: Discount code contains "WELCOME" AND Customer orders count equals 1 (first order by this account)
- Action: Get customers (GraphQL query: filter by matching shipping address from this order)
- Condition: If matching customer exists AND that customer has placed previous orders, tag as "discount-abuse-suspected"
Honest limitation: Flow can't do cross-customer address lookups natively. The address-matching variation requires a GraphQL query to the Admin API. The simpler "order count greater than 1" approach catches approximately 70% of abuse cases with zero complexity. For most stores, that's the right trade-off.
Our Take: Perfect detection is probably not worth the dev time for most stores. The simple version handles the clear cases. Flag it, review it, act on patterns. Don't let perfect be the enemy of good here.
25. B2B Net Payment Terms Reminder Sequence
🔴 Advanced | Setup time: 1-2 hours | 🏷️ Shopify Plus required
The setup: B2B merchants on Shopify Plus using native payment terms (net-15, net-30, net-60) need payment reminders without a separate accounts-receivable tool.
- Trigger: Order created (B2B order with payment terms)
- Action: Wait 20 days (for a net-30 order)
- Condition: Order payment status equals pending
- Action: Send Shopify Messaging email to company contact: "Invoice [order number] is due in 10 days. [Payment link]"
- Action: Wait 10 days
- Condition: Order payment status equals pending
- Action: Send second reminder email + Notify internal AR team via email or Slack
- Action: Wait 7 days
- Condition: Order payment status equals still pending (overdue)
- Action: Add company tag "payment-overdue" + Notify account manager
⚠️ Critical Implementation Warning: This workflow only functions if you're using Shopify's native B2B payment terms. If you're using a custom invoicing solution (Invoice Hero, QuickBooks integration, a third-party billing tool), the payment status field in Shopify won't update when the invoice is paid elsewhere. The workflow will keep sending reminders for orders that have already been settled in your external system. Verify your B2B payment workflow uses Shopify's native payment terms before building this. If you're on a hybrid setup, you need a custom integration to sync payment status back to Shopify first.
Our Take: For Plus merchants with a B2B channel, this workflow replaces a manually-managed AR reminder process. The multi-step wait-and-check pattern is exactly what Flow's architecture is built for: time-based conditional follow-ups with no human in the loop.

How We Used Flow to Eliminate 15 Hours of Manual Work Per Week
A DTC apparel brand we work with came to us spending roughly 15 hours per week on order triage. Two-person ops team. Every morning, both of them would manually review overnight orders for fraud signals, tag orders by product category for warehouse picking, and email their logistics contact for rush shipments. Over and over.
We built four Flow workflows in one afternoon.
The four workflows:
- Auto-cancel HIGH-risk orders (covered as Workflow 2 in this guide)
- Tag MEDIUM-risk orders "fraud-review" for manual check, which reduced the manual review queue from 200+ orders per week down to 15
- Tag orders by product category (using the product type field) for warehouse picking efficiency
- Send a Slack alert to the logistics channel for any order with an expedited shipping rate
The outcome: The ops team went from spending about 3 hours per day on order triage to roughly 20 minutes. The workflows cost nothing. Flow is free. All four automations took about 3 hours to build and test.
What broke during setup:
We broke the fraud workflow twice during testing. First time: we set the condition to "fraud score greater than 0.8" instead of "risk level equals HIGH." Shopify's fraud analysis doesn't expose the underlying score to Flow the same way it exposes the categorical risk level.
Second time: the Slack connector token expired during a two-week period we were in production on another project. The workflow silently stopped sending Slack alerts for 11 days before we caught it through a manual audit.
Both issues were caught before they caused real problems, but they required checking Flow's run history to diagnose. Debugging matters. We cover it in the next section.
This story isn't unique. Nearly every store we work with has at least 10-12 hours of weekly manual ops work that Flow can absorb. The hard part isn't building the workflows. The hard part is knowing which ones to prioritize.
When Not to Use Shopify Flow (The Honest Version)
Shopify won't publish this section. Mesa won't publish it either. They want you to upgrade to their paid tool. We don't sell Flow and we don't sell an alternative. So we can tell you when Flow isn't the right answer.
Flow Can't Do These Things
| What You Want | Why Flow Can't | What to Use Instead |
|---|---|---|
| Trigger on page views or browse behavior | Flow has no storefront event triggers | Klaviyo (pixel tracking) |
| Real-time dynamic pricing at checkout | Flow actions run async, not at checkout | Shopify Functions |
| Complex conditional discounts at checkout | No checkout trigger in Flow | Shopify Functions + discount API |
| Long multi-month nurture email sequences | Wait actions are limited; Flow isn't a CRM | Klaviyo Flows |
| Query external APIs and use the response | Flow can POST to APIs but can't read responses natively | Custom app or Zapier |
| True parallel execution (do A and B simultaneously) | Flow actions run sequentially only | Custom app |
| Math operations (multiply, divide, percentages) | Flow conditions do comparisons, not arithmetic | Custom app or metafield workarounds |
| Native SMS notifications | Flow doesn't send SMS | Klaviyo, Postscript, or Attentive |
| Cross-store data syncing | Flow is per-store, no native cross-store capability | Custom app or API |
| Act on webhook responses | Flow can fire webhooks, can't act on the response | Custom app |
The 100-Action Workflow Limit
Flow workflows cap at 100 actions per run. You won't hit this on standard reactive workflows. You can hit it on complex looping workflows that process large data sets. The solution: break complex workflows into multiple linked workflows, where the last action in Workflow A triggers the start of Workflow B.
When Klaviyo Flows Beat Shopify Flow
- Email nurture sequences with A/B testing: Klaviyo
- Browse abandonment (requires pixel-level storefront tracking): Klaviyo
- Post-purchase flows with dynamic product recommendations: Klaviyo
- Complex multi-branch customer journeys over weeks or months: Klaviyo
The rule we use with clients: if it involves email content and customer journey logic, use Klaviyo. If it involves Shopify data operations (tagging, order management, metafield writes, internal notifications), use Flow. They're not competing tools. They are complementary tools with different strengths.
For a deeper comparison of the email tools that pair best with Flow, see Klaviyo vs Omnisend and Best Email Marketing for Shopify.
When to Build a Custom App Instead
- You need to read an API response and act on it within the same workflow
- You need complex arithmetic or math logic
- You need true real-time execution (Flow has delays of seconds to minutes)
- You're syncing data across multiple Shopify stores
- Your logic exceeds what 100 actions can cover
Our Take: Flow is genuinely excellent at what it does. Shopify-native, event-driven automation with a clean visual builder and zero monthly cost. The mistake is treating it as a general-purpose automation platform. Know its edges and you'll never be disappointed by it.
Testing and Debugging Shopify Flow Workflows
No competitor article covers this. It's where merchants actually get stuck.
Before You Activate: Use Flow's Test Feature
Every workflow in the Flow editor has a "Test" button. It simulates a trigger event and runs your conditions to show you whether the workflow would fire or skip. Use it before activating anything.
The limitation: Test mode evaluates your conditions but doesn't execute the actions. It won't actually send an email, add a tag, or fire an API request. For that, you need a real test event.
For real testing: Create a test order that matches your trigger conditions exactly. Let it fire. Then check the run history to confirm every step executed correctly. Use a test product and a test customer. Do not run live orders through an untested workflow.
Reading the Run History
Go to the Flow app, open your workflow, and click the "Run history" tab. Every time the workflow evaluates a trigger event, it logs an entry. Each entry shows one of three statuses:
- Success: The workflow ran and all actions completed
- Skipped: The trigger fired but conditions didn't match, so the workflow did nothing
- Error: A step failed (action misconfigured, connector app offline, API rate limit hit)
"Skipped" is the most common confusion point for new Flow users. They activate a workflow, create an order, nothing happens, and they assume the workflow is broken. It's almost always a condition that didn't match. Check run history before spending 30 minutes looking for a bug that isn't there.
Common Reasons a Workflow Doesn't Fire
| Symptom | Likely Cause | Fix |
|---|---|---|
| Run history shows "Skipped" | Conditions didn't match the test event | Review each condition; check exact field values and comparisons |
| Run history shows "Success" but tag doesn't appear | Action targeted wrong object (order vs. customer) | Check action settings; confirm you're tagging the right entity |
| Workflow fires but email isn't received | Email in spam or wrong address in action | Check spam folder; verify email address configured in action |
| For Each workflow times out or runs partially | List too large for single run | Add tighter filters to your Get Data action |
| Connector app action fails consistently | App token expired or app not installed on store | Reinstall or reconnect the connector app; refresh OAuth token |
| Workflow worked for two weeks, now stops | Run limit reached or connector auth expired | Check run limit settings; re-authenticate connector |
| Workflow fires but GraphQL action returns error | API scope missing or malformed mutation | Check custom app permissions; validate mutation syntax |
The Meta-Workflow: Monitor Flow Errors
One of the most useful things you can build in Flow is a workflow that monitors itself. In the Flow trigger list, look for "Workflow run resulted in an error" as your trigger type.
- Trigger: Workflow run resulted in an error
- Action: Send email to yourself with workflow name, error type, and timestamp
This gives you a self-monitoring system. When any workflow in your store hits an error, you know about it immediately. We set this up for every client before we hand off their Flow configuration. Without it, connector token expirations and API failures can go undetected for weeks.
💡 Pro Tip: Name your workflows with a clear convention. "Orders: Cancel High Risk v2 (Active)" is better than "Untitled workflow 3." When you have 20+ workflows running and one starts producing errors, clear names cut your debugging time in half.
Frequently Asked Questions
Are Shopify Flow examples free?
Yes. Shopify Flow is a free app available on all paid Shopify plans (Basic, Shopify, Advanced, and Plus). The 150+ pre-built workflow templates in the Flow template library are also completely free to install. Some workflows require paid third-party apps (Klaviyo, Gorgias, LoyaltyLion) to execute certain actions, but Flow itself costs nothing.
Do I need Shopify Plus for Shopify Flow?
No. Flow was Plus-only until 2022. It's now free for all paid Shopify plans. The only Plus-exclusive workflows are B2B-specific features: wholesale company accounts, B2B order tagging, and net payment terms. Everything else in this guide works on Basic, Shopify, and Advanced plans.
Where can I get Shopify Flow examples as a PDF?
Shopify doesn't publish an official Flow examples PDF. The closest equivalent is the official template library inside the Flow app at admin.shopify.com/apps/flow, which has 150+ pre-built templates you can install directly. This guide covers the most useful examples with full setup instructions. Bookmark it rather than printing.
What is the best Shopify Flow example?
For most stores, the low-inventory alert (Workflow 1) and the high-risk order cancellation (Workflow 2) deliver the most immediate value with the least setup time. Both take under 15 minutes to configure and work without any additional apps. Start there.
What can Shopify Flow not do?
Flow can't trigger on storefront events (page views, browse behavior), do math operations, run workflow steps in parallel, read external API responses natively, or send SMS. For email nurture sequences with complex branch logic, Klaviyo is the stronger tool. See the limitations section above for the full breakdown with alternatives.
How do I find Shopify Flow templates?
Open the Shopify Flow app in your admin, click "Templates," and browse by category. There are 150+ free templates. You can also find templates in Shopify's official workflow examples documentation and from connector apps like Klaviyo, Gorgias, and LoyaltyLion.
Does Shopify Flow work with Klaviyo?
Yes. Klaviyo is one of Flow's connector apps. You can trigger Klaviyo events from Flow (add a customer to a list, fire a custom event, update a profile property) and use Klaviyo's Shopify integration to respond to Flow-triggered customer tags. The standard agency pattern: Flow handles data operations and tagging, Klaviyo handles email content and sequencing. See Shopify Email vs Klaviyo for more on when to use each.
How do I loop through orders in Shopify Flow?
Use the "For Each" action combined with a "Get orders" data action. Set a scheduled trigger, use "Get orders" with your target filters, then add a "For Each" loop to process each order individually. See Workflows 17, 19, and 20 in this guide for detailed configurations including the advanced scheduled sweep pattern.
Start With the Workflows That Matter
The best Shopify Flow setup isn't 25 workflows running simultaneously. It's five or six workflows you actually built correctly and test regularly.
Start with the high-risk order cancellation, low-inventory alert, and customer tier tagging. Add the sales channel tags and the first-order tag. That's 30-45 minutes of setup and you've covered the foundation. Add complexity once those are solid and you've read the run history enough times to trust them.
One more thing: Shopify updates Flow regularly. The workflows in this guide were verified against Flow's current UI and Shopify's Admin API 2025-01. We update this article when Flow changes.
Last updated: February 21, 2026. Workflows verified against Shopify Flow's current UI and Admin API 2025-01. We update this guide when Flow changes.
We love working with ambitious Shopify brands.
We can help optimize your store's conversion rate and increase sales.
We can create custom apps that integrate third-party services or add new features to your store.
We can create any theme customization you need to improve the look and feel of your brand.
Get in Touch
Written by
Alex Espinoza
Alex is the founder of AESYMMETRIC, a Shopify agency specializing in conversion rate optimization, custom app development, and theme customizations. With eight years of experience in the Shopify ecosystem and e-commerce industry, he helps brands maximize sales and reduce costs through data-driven strategies and innovative technical solutions.